Tuesday, January 19, 2016

Friends Season - Science behind Earrings by Dena Madhwani

Today is day-two of our Friends Season :) 'Friends Season' is a great opportunity for me to realize how creative people get when they are not given a topic to write and they come up with brilliant content and that too on a short notice. The purpose of this season is to learn this creativity from friends and imbibe that into my thoughts for the future posts of beingdhriti!

Have you ever wondered if there is a science behind what nail color you should wear or which dress might suit you? I have never and I am sure most of you haven't. But here is my curious friend Dena transforming her dislike for earrings to something that has become the most important part of her outfit by studying the science behind what will suit her face. I know her since more than two years now. She is very innocent, beautiful and energetic. She is a fun-loving person who loves to travel and take lots of pictures :)

Beautiful, Cute, Fashionista Dena with her Dashing Hubby Pankaj!

Over to you, Dena -

Jaya asked me to write a guest post for her blog. Now the big question was on which topic should I write? Jaya told me I can write about anything, any topic in this world. It made things easy :) I had arranged my wardrobe few days back and so the thing which was on the top of my mind was my earrings collection. So I thought it will be a good idea to share my story about earrings love!

Earlier I used to think big artificial earrings were not for me. It will never suit me. So I never tried them. Then I tried some times but never liked it. Then my very dear cousin Vaishali gave me some beautiful earrings as gift. I tried them and my thinking started changing. I started loving artificial earrings. Today I am in full love with my earrings. I feel like my any dress-up is incomplete without earrings! When I get perfect matching earring with my dress from my collection, I feel like THIS IS IT! :)

As I explored more about earrings, I found there is science behind it that which earring suits which type of face cut. With some research and trial and error you can find perfect shape of earrings, which suits your face cut.

My face-cut is round. So chandelier shaped earrings or any earrings that give my face more height and width are perfect for my face.



Butterfly earrings!

I should not wear round shaped earrings. It makes round face more round. And studs are also not very good option for my face cut. But I like studs also. So when I wear studs I make sure to give good colors to my eyes. Because when we try small earrings focus will be on our eyes and when we use long earrings focus will be on our lips.
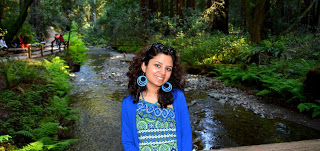


After I started liking earrings. Wherever I visit, I started buying earrings. So I had many earrings collected from different places. But then there are many earrings and if you don't take care of it nicely then it may break or you may loose some. So arranging them nicely become very important part.
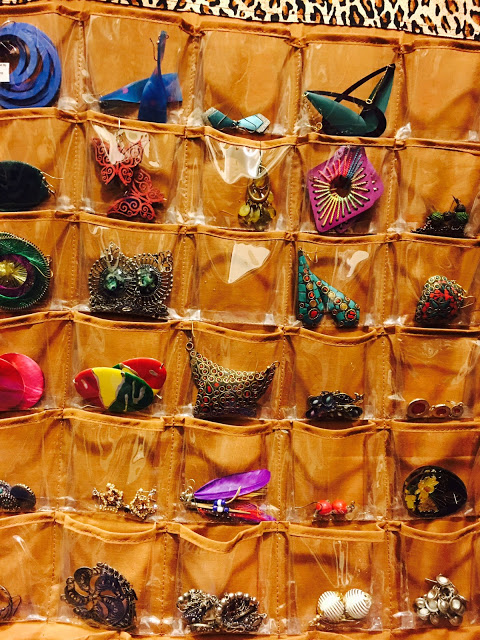


I use hanging jewelry organizer for my earrings. You can easily find it online or at stores like Marshalls or Ross. There are many earring organizers available like earring trays, earring holder stand, Wall mounted earring holders, Stylish hand or tree to hold earrings. You can arrange it by size, color, style. I have arranged it by color, so I can easily find it whenever I need and I can easily put it back.  If you are traveling then you can pack your matching earrings in small packing bags or small plastic box with hard surface so that it does not break.


I am a baby blogger who started writing by getting inspired by Jaya's very interesting, perfect and very lively blogs. I am very happy to write this small post for Jaya's blog. I hope you enjoyed my earrings story.

Monday, January 18, 2016

Friends Season - Love for Gardening by Roma Mehta

Happy New Year everyone :) Finally the holiday season is over and seems like things are settling down and coming back to routine. In this new year, I want to learn new things, try new cuisines, explore new places and blog about all my crazy experiences. Though I am an amateur blogger, I want to become better this year. 

I wanted to start the new year with something fresh and lively. So I asked few of my friends to write a short post for me which is what I call - My 'Friends Season'. And boom! Here it is - one of the fresh and green blog post of the year by Roma Mehta with her love for Gardening. I have known Roma for more than four years now. She is very creative, enthusiastic person and a Facebook fanatic. Other thing that distinguishes her from others is she has very crazy ideas. She is my go-to person whenever I want ideas to surprise any of my friends or family ;)

Roma in haseen vadiyan!

Over to you Roma --

Jaya and I share a lot of things in common, blogging is just one of them. Like seriously, our lives are very similar in a lot of uncanny ways. When she asked me to write a blog post for her blog, I was confused as I am new to this concept. But later I understood what it means and asked her for suggestions on some topic to write about. She said - “Anything you are passionate about or any of your recent projects”. “Gardening!” was the first thought in my mind. This is the only complete DIY thing in my life right now, just mine! So we got a home in San Jose early this year and the backyard is part patio and rest is open for me to do whatever my imagination commands. I will try to put pictures with each small project so that it’s easier to relate.


Now I have zero experience in gardening, have never planted a single plant myself. But I guess it’s in my blood as my dad is a hard core gardener. So since we moved in our home, patio and backyard got the least attention. After we settled in, I started thinking about having a kitchen garden in the backyard. Immediately made a trip to Home Depot and got potting soil and some plants like green bell pepper, strawberry, mint, tomato and colored leaves.


Once I potted them using potting soil, it just got me going. There was no stopping me after that. I also discovered that planting seeds is easy. I used seeds of green chillies, really spicy ones that Prerak’s aunt got us from LA. Once planted and regularly watered, the green chilly plants actually started growing. But since I had planted about 10-12 seeds, all those saplings grew at once and were competing with each other for the soil and space. I had to move some of them to a different area to allow them to grow separately.


For the green bell pepper plant, for the longest time I did not even realize that the flowers had started growing into bell peppers! I used to water the plants after I come home from work and it was usually dark when I did that. On a weekend I saw 3 of them grown into fully blown bell peppers and it was really exciting! I harvested them and also made a Gujarati preparation out of it!

Bell Peppers - From flowers to bell peppers 


Strawberries started growing well too, but I never actually got to taste a single of them because of the squirrels who always eat it up before I can harvest.


Little strawberries


After a successful attempt at kitchen garden, I moved on to having more colors in the home. Our friends Harsh and Esha gifted us hanging floral baskets for the new home and we found the perfect spot to hang them - the front door! Believe it or not, we got them in August and they are still blooming in the month of November. The colors are just so soothing and add a very fresh touch to the front door.


Now it was time to add colors to the backyard.


Colors!


I had no more space left on the patio side pots that I had. So it was time to get into edging the backyard. I initially thought I will buy pavers and get it done by some gardener. But then, just out of curiosity I googled up on how to edge the backyard myself, and it seemed pretty doable. Well, it was a little tougher than I thought it would be, but it was a super fun project. I am yet to finish it, but here is a picture of the work in progress.

In progress


Once the initial edge was ready, I planted lilies and eureka lemon. The plan for future is to get fruit plants as spring approaches.


Lilies and Eureka Lemon

The previous owners had some rose plants which add some more colors -


Roses

As a couple months passed, California saw rains! That meant that the front yard lawn was going green! Here is a before-after picture for reference:


Before and After


My visits to Home Depot and Lowes gardening sections increased as my interest in gardening grew and I kept adding colors around the home. Since my dad is visiting us, currently staying with my sister in NJ, so I keep discussing new gardening ideas with him. One day he told me that he got 50 tulip bulbs and planted them in the front yard of my sister’s home. I had bought tulip bulbs a long time back but just kept those in the fridge since the rule is, you plant them late fall and they begin to bloom in spring. I just wanted to get hold of the colors I wanted - Lavendar, pink and red. So last weekend I thought the timing was perfect since it has begun to get cold. So I dug 6 inch deep holes and planted a bulb in each of them. I am now eagerly waiting for spring so that I can see those colors in front of my home, will share a picture once they are here!


As you can see in most of the pictures, I have added mulch around the plants, it’s a great way to retain water and I like the red color! Gardening has really given my life a new excitement. In my free time, I keep thinking of fruits, flowers and veggies that I want to add. Watering them is another calm and serene 15 minutes that I get every alternate day. To see them grow, to take care of them, trim and harvest them is really satisfying. My dad will be staying with me for a few weeks in March, which is perfect spring time, so I will use his experience and gardening knowledge at that time to plant some fruits. I have some grand DIY plans for further expansion of my backyard, also planning to expand the patio area, hopefully by next summer it’s ready to welcome the bbq parties!

Friday, January 8, 2016

Tahoe Reno Trip Dec 2015

We visited Tahoe and Reno for 2015 Christmas and our anniversary celebration. It was a lot of fun skiing with friends and casino hoping in Reno !!!

This is an effort-less post :) Google created this video for me when I uploaded my iphone photos on Google photos. Google did a very good job in creating this video. Moreover an effortless post on my blog :)


Well I think I am becoming lazy in putting efforts to write my blog posts. Hmm... Didn't I take a resolution to blog more in 2016? 

Yeah, I did take that as one of my resolutions. I will come back soon with more content. Till then stay tuned and watch the video!

Egg-free Alcohol-free Tiramisu Recipe

Making Tiramisu had been on my to-do list since quite some time. I always thought it would be very difficult for me and it will take me to the next level in Baking! It is one of our favorite deserts lately. I love Paris Baguette Tiramisu <3 But when I made it last week, I felt it was literally a piece of cake.

This is the fastest cake recipe that I have ever made and which doesn't need any baking! Quick and easy to make! I made this Jain version of Tiramisu for a Baby shower party at work. It was a grand success! :) 

Ingredients:

Soft White bread
1 cup Mascarpone cheese at room temperature
1 cup heavy Whip cream
3 tablespoon coffee
1 teaspoon vanilla extract
1 cup sugar

Method:

Step 0: Make the coffee syrup: Take 3/4th cup water and add 3 tablespoon coffee and 2 tablespoon sugar. Mix it till sugar dissolves. 

Step 1: First take a bowl and whip the whipping cream using an electric mixer. [ I freeze the electric mixers attachments and the bowl in which I want to whip the cream. The idea is it should not get hot. Since you whip it for around 10 minutes, it generates heat. So to make sure it remains cool even after 10 minutes I freeze both the bowl and the attachments from the electric mixer.] Whisk it till the cream starts sticking to the mixers blade or until stiff peaks start forming. Thats the indication that it is done. 

Step 2: Once the Whip cream is close to ready, add the sugar and vanilla extract to it and mix it for 10-15 seconds. Or stir it with spoon. 

Step 3: In another bowl whisk mascarpone vigorously by hand until creamy and smooth. 

Step 4: Fold whipping cream into mascarpone in 2 additions until mixture is smooth.

Assemble tiramisu:

Take a deep glass 8 inch or individual glasses. Put a layer of this whip cream and mascarpone cheese mixture at the bottom and lay a layer of bread on it. Make sure to cut the sides of the bread. If necessary cut the bread in order to make one single layer of bread on the bake dish and to fit them in the dish. Take spoon and pour the coffee mixture on the top of this bread layer. Put a layer of whip cream on the top and sprinkle some chocolate powder over it. Repeat with second, third, fourth layer as you see fir. Cover and refrigerate for atlas 6 hours or unto 2 days. 

Serve cold. Right before serving dust the top with cocoa powder or chocolate or both! I sprinkled it with Bournvita :)

We made the small glasses for ourselves for us to relish later!

Proud of us!

Friday, January 1, 2016